245 lines
16 KiB
Markdown
245 lines
16 KiB
Markdown
UIEffect
|
|
===
|
|
|
|
UIEffect provide visual effect components for uGUI element in Unity.
|
|
|
|
[](https://github.com/mob-sakai/UIEffect/releases)
|
|
[](https://github.com/mob-sakai/UIEffect/releases)
|
|

|
|
[](https://github.com/mob-sakai/UIEffect/blob/master/LICENSE.txt)
|
|
[](http://makeapullrequest.com)
|
|
[](https://twitter.com/intent/follow?screen_name=mob_sakai)
|
|
|
|
<< [Description](#Description) | [WebGL Demo](#demo) | [Download](https://github.com/mob-sakai/UIEffect/releases) | [Usage](#usage) | [Example of using](#example-of-using) | [Development Note](#development-note) >>
|
|
|
|
### What's new? [See changelog ](https://github.com/mob-sakai/UIEffect/blob/develop/CHANGELOG.md)
|
|
### Do you want to receive notifications for new releases? [Watch this repo ](https://github.com/mob-sakai/UIEffect/subscription)
|
|
### Support me on Patreon! [](https://www.patreon.com/join/2343451?)
|
|
|
|
|
|
|
|
<br><br><br><br>
|
|
## Description
|
|
|
|
Let's decorate your UI with effects!
|
|
You can control parameters as you like from the script as well as inspector.
|
|
AnimationClip is supported as a matter of course!
|
|
|
|

|
|
|
|
|
|
<br><br>
|
|
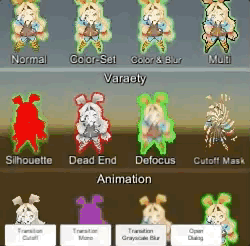
#### Available effects
|
|
|
|
| Component | Features | Screenshot |
|
|
|-|-|-|
|
|
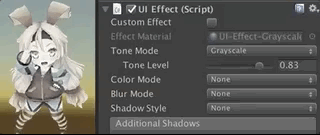
|**UIEffect**|Combine some visual effects.<br><br>**Effect Mode:** Grayscale, Sepia, Nega, Pixelation<br>**Color Mode:** Multiply, Fill, Additive, Subtract<br>**Blur Mode:** Fast, Medium, Detail<br>**Advanced Blur:** Enable more beautiful blurring.|<img src="https://user-images.githubusercontent.com/12690315/46639603-258df180-cba2-11e8-8f50-9e93bdc4c96e.png" width="600px">|
|
|
|**UICaptured EffectImage**|Capture a screenshot of a specific frame with effect, and display it.<br>This effect is non-realtime, light-weight, less-camera, but be effective enough.<br><br>**Effect Mode:** Grayscale, Sepia, Nega, Pixelation<br>**Color Mode:** Multiply, Fill, Additive, Subtract<br>**Blur Mode:** Fast, Medium, Detail<br>**Quality Mode:** Fast, Medium, Detail, Custom<br>**Capture On Enable:** When the component is enable, capture screen automatically.<br>**Blur iterations:** Number of blur iterations.<br>**Reduction/Downsampling Rate:** None, x1, x2, x4, x8<br>**Fit size to screen:** Fit RectTransform to the screen on captured.<br>**Immediate Capturing:**<br><br>*NOTE: This component can be used with UIEffect, UITransition etc.*<br>*NOTE: Immediate capturing does not support LWRP, WebGL and Unity 5.x for iOS/Mac.*|<img src="https://user-images.githubusercontent.com/12690315/44078752-4c2e4114-9fe2-11e8-97f0-54d3a36a562e.gif" width="600px">|
|
|
|**UIShiny**|Apply shining effect to a graphic.<br>The effect does not require Mask component or normal map.<br><br>**Parameters:** Effect factor, Width, Rotation, Softness, Brightness, Gloss<br>**Effect Player:** To play shining, enable `Play` in inspector or call `Play()` from script.|<img src="https://user-images.githubusercontent.com/12690315/46639689-b1078280-cba2-11e8-8716-cbc634af7293.gif" width="600px">|
|
|
|**UIDissolve**|Apply dissolve effect to a graphic.<br><br>**Color Mode for edge:** Multiply, Fill, Additive, Subtract<br>**Parameters:** Effect factor, Width, Rotation, Softness, Edge color<br>**Options:** Effect area, Keep effect aspect ratio<br>**Effect Player:** To play dissolving, call `Play()` from script.|<img src="https://user-images.githubusercontent.com/12690315/46639690-b1078280-cba2-11e8-8aa9-1d2650fe9a62.gif" width="600px">|
|
|
|**UIHsvModifier**|Modify HSV for graphic.<br><br>**Target:** Color, Range<br>**Adjustment:** Hue, Saturation, Value|<img src="https://user-images.githubusercontent.com/12690315/43200006-d6e2bf54-904e-11e8-9f22-0c0f9ce5912f.gif" width="600px">|
|
|
|**UITransition Effect**|Apply transition effect with a single channel texture.<br><br>**Effect Mode:** Cutoff, Fade, Dissolve<br>**Options:** Effect area, Keep effect aspect ratio, transition texture<br>**Pass Ray On Hidden:** Disable the graphic's raycastTarget on hidden.<br>**Effect Player:** To show/hide transition, call `Show()/Hide()` from script.|<img src="https://user-images.githubusercontent.com/12690315/46639688-b1078280-cba2-11e8-8bbb-16b8498bca5f.gif" width="600px">|
|
|
|
|
<br><br>
|
|
##### The following effects can be used with the above components.
|
|
|
|
| Component | Features | Screenshot |
|
|
|-|-|-|
|
|
|**UIShadow**|Add shadow/outline to a graphic.<br>The performance is better than the default Shadow/Outline component.<br><br>**ShadowStyle:** Shadow, Shadow3, Outline, Outline8|<img src="https://user-images.githubusercontent.com/12690315/46639604-258df180-cba2-11e8-98a9-aa31f04c695d.png" width="600px">|
|
|
|**UIGradient**|Change vertex color as gradient with angle and offset.<br><br>**Direction:** Horizontal, Vertical, Angle, Diagonal<br>**Options:** Offset, Color space|<img src="https://user-images.githubusercontent.com/12690315/40716995-ca87665e-6445-11e8-8233-ec2e21fefd6b.png" width="600px">|
|
|
|**UIFlip**|Flip a graphic.<br><br>**Direction:** Horizontal, Vertical, Both|<img src="https://user-images.githubusercontent.com/12690315/40716996-cab1fd7e-6445-11e8-9753-962d23991d86.png" width="600px">|
|
|
|
|
|
|
|
|
|
|
<br><br><br><br>
|
|
## Demo
|
|
|
|
[WebGL Demo](http://mob-sakai.github.io/UIEffect)
|
|
|
|
* Effect sample
|
|
* Transition
|
|
* Dialog window with blured background
|
|
* Included in unitypackage
|
|
|
|
|
|
|
|
|
|
<br><br><br><br>
|
|
## Usage
|
|
|
|
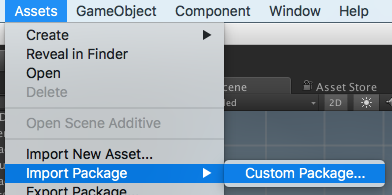
1. Download UIEffect.unitypackage from [Releases](https://github.com/mob-sakai/UIEffect/releases).
|
|
2. Import the package into your Unity project. Select `Import Package > Custom Package` from the `Assets` menu.
|
|
|
|
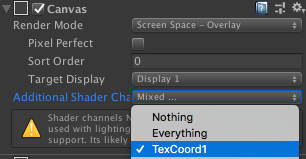
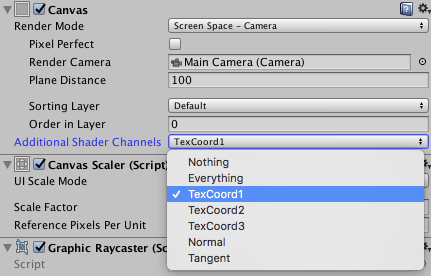
3. In Unity5.6+, enable `TexCoord1` channel of canvas. See also [Development Note](##note-unity-56).
|
|
|
|
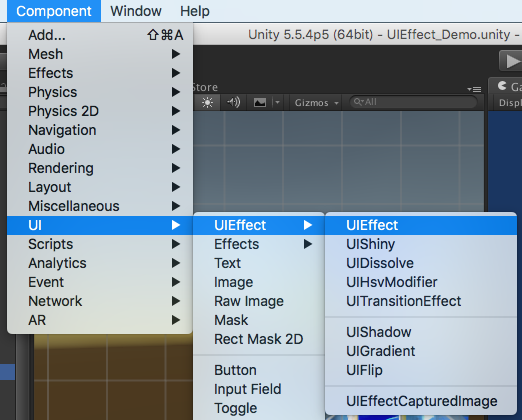
4. Add any effect component to UI element (Image, RawImage, Text, etc...) from `Add Component` in inspector or `Component > UI > UIEffect > ...` menu.
|
|
|
|
6. Adjust the parameters of the effect as you like, in inspector.
|
|

|
|
7. Enjoy!
|
|
|
|
|
|
#### Usage with TextMeshPro
|
|
|
|
1. Add a symbol `TMP_PRESENT` to scripting define symbols.
|
|

|
|
2. If the material does not support the effect component, the following warning will be displayed.
|
|
When you press the Fix button, new material is automatically generated and set.
|
|

|
|
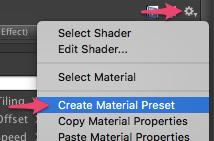
3. If you want to use material variants, select `Create Material Preset` from the context menu to duplicate the material.
|
|
|
|
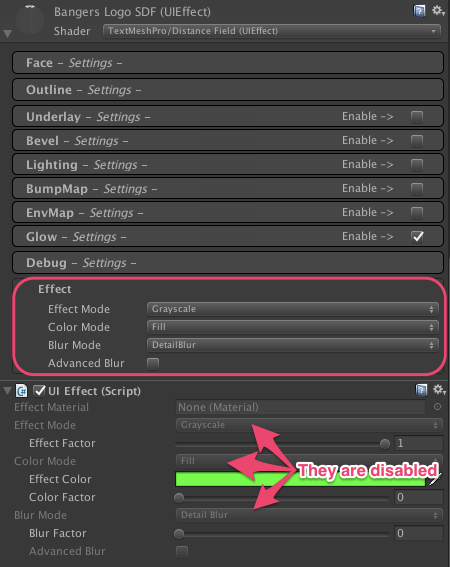
4. Effect mode, color mode, blur mode and etc. can not be changed from the component editor.
|
|
Change them from the material editor.
|
|
|
|
5. If you want to enable "Advanced Blur", enable `TexCoord2` channel of canvas.
|
|

|
|
|
|
|
|
#### Usage without TextMeshPro
|
|
|
|
1. When you uninstalled TextMeshPro from the project, remove a symbol `TMP_PRESENT` to scripting define symbols.
|
|

|
|
|
|
|
|
##### Requirement
|
|
|
|
* Unity 5.5+ *(included Unity 2018.x)*
|
|
* No other SDK are required
|
|
|
|
|
|
|
|
|
|
<br><br><br><br>
|
|
## Example of using
|
|
|
|
| Case | Description | Screenshot |
|
|
|-|-|-|
|
|
|Lock/unlock contents|Use UIEffect to apply grayscale.<br>Indicate to user that the content is unavailable.||
|
|
|Silhouette|Use UIEffect for filling color.||
|
|
|Soft shadow/<br>Outer glow|Use UIEffect and UIShadow to blur the shadow.<br>To blur only shadow, set `Blur Factor` in UIEffect to 0.||
|
|
|Colored shadow|Use UIEffect and UIShadow to fill shadow with color.<br>To fill only shadow, set `Color Factor` in UIEffect to 0.||
|
|
|Blurred dynamic font|Use UIEffect to blur text.<br>To blur dynamic font cleanly, enable `Advanced Blur` option.||
|
|
|Text with outline & shadow|Use two UIShadows to add outline and shadow.<br>There is less overdraw than default Outline/Shadow `(Default: 1 x 5 x 2 = 10 overdraws, UIShadow: 1 + 4 + 1 = 6 overdraws)`.||
|
|
|Shining button|Use UIShiny for shining button.<br>Shine the button and indicate to user that you can press the button.<br>Enable `Play` and `Loop` option to shine it without any AnimationClip.||
|
|
|Blurring the background of a menu|Use UIEffectCapturedImage to blur the background of a menu.<br>UIEffectCapturedImage applies an effect to the screen of the previous frame, without adding a camera or layer.<br>It's not a real-time post effect, so it's good performance and works well on mobile.|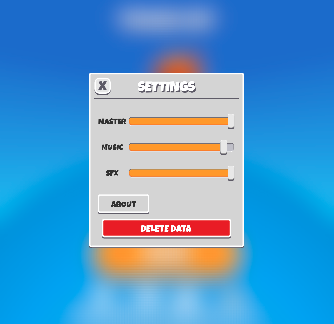|
|
|
|Screen transition|Use UITransitionEffect to add screen transition.<br>You can change transition texture (single channel texture).<br>Enable `Pass Ray On Hidden` option and use `Show()/Hide()` method to play transition without AnimationClip.||
|
|
|
|
|
|
|
|
|
|
<br><br><br><br>
|
|
## Development Note
|
|
|
|
#### How does UIEffectCapturedImage work?
|
|
|
|
|
|
|
|
`UIEffectCapturedImage` is similar to post effect, but uses `CommandBuffer` to give effect only on the rendering result (= captured image) of a specific frame.
|
|
This effect is non-realtime, light-weight, less-camera, blit only once, but be effective enough.
|
|
|
|
* Camera for processing effect is unnecessary.
|
|
* Process effect only once after `UIEffectCapturedImage.Capture`.
|
|
* Using reduction buffer, keep using memory size small and keep the rendering load are small.
|
|
* When GameObjects with motion are on the screen, a result texture may be stirred.
|
|
* You can overlay and display like as:
|
|
`[Screen] | [UIEffectCapturedImage] | [Dialog A] | [UIEffectCapturedImage] | [Dialog B]`.
|
|
See also [Demo](#demo).
|
|
|
|
|
|
#### Why is UIEffect lightweight?
|
|
|
|
* UIEffect pre-generates material from a combination of effects. This has the following benefits.
|
|
* Draw call batching If possible, draw calls will decrease.
|
|
* Since only the required material and shader variants are included in the build, the build size will be smaller.
|
|
|
|
|
|
#### How to control effect parameters for uGUI element WITHOUT MaterialPropertyBlock?
|
|
|
|
* In general, you can use [MaterialPropertyBlock](https://docs.unity3d.com/ScriptReference/MaterialPropertyBlock.html) for renderers to control minor changes in the material without different batches.
|
|
* However, changing the [MaterialPropertyBlock](https://docs.unity3d.com/ScriptReference/MaterialPropertyBlock.html) of the uGUI element from the script will cause different batches and draw calls to increase.
|
|
* So UIEffect encodes multiple effect parameters to UV1 channel with [IMeshModifier](https://docs.unity3d.com/ScriptReference/UI.IMeshModifier.html).
|
|
* Pack four 6-bit [0-1] (64 steps) parameters into one float value.
|
|
* The parameters are lower precision, but sufficient.
|
|
|
|
| uv1 | 6-bit [0-1] | 6-bit [0-1] | 6-bit [0-1] | 6-bit [0-1] |
|
|
|-|-|-|-|-|
|
|
| x(32bit float) | Tone level | *Empty* | Blur level | *Empty* |
|
|
| y(32bit float) | Red channel | Green channel | Blue channel | Alpha channel |
|
|
|
|
* In v3.0.0+, UIEffect uploads the parameter value to a shared texture and the shader refers to it.
|
|
This approach has the following advantages:
|
|
* More parameters for the effect are available.
|
|
* The parameter accuracy is improved from 6 bits to 8 bits.
|
|
* ModifyMesh is not called when parameter value is changed.
|
|
|
|
|
|
#### Note: Unity 5.6+
|
|
|
|
In Unity 5.6+, Canvas supports **Additional Shader Channels**.
|
|
Please enable `TexCoord1` to use UIEffect.
|
|
|
|

|
|
|
|
|
|
#### Note: if you include prefabs / scenes containing UIEffect in AssetBundle.
|
|
|
|
Use script define symbol `UIEFFECT_SEPARATE`.
|
|
Unused shader variants and materials will be excluded from AssetBundles.
|
|
|
|
||Combined mode (default)|Separated mode|
|
|
|-|-|-|
|
|
|Script define symbol| - |`UIEFFECT_SEPARATE`|
|
|
|Included in build|Only used variants|Only used variants|
|
|
|Included in AssetBundle|All variants (Heavy!)|Only used variants|
|
|
|Look in editor|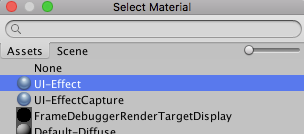|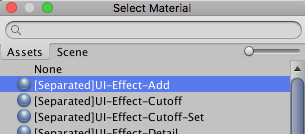|
|
|
|
|
|
|
#### How to improve performance?
|
|
|
|
* Use `ShaderVariantCollection` to preload shader.
|
|
https://docs.unity3d.com/Manual/OptimizingShaderLoadTime.html
|
|
* Set camera's clear flag to "Solid Color".
|
|
* Enable multi thread rendering.
|
|
|
|
|
|
#### The issue of default Outline component
|
|
|
|
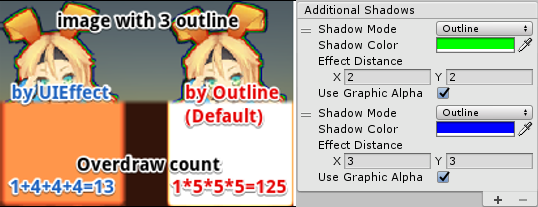
Graphic with multiple outline components will generate a lot of overdraw.
|
|
|
|
|
|
|
|
This is an overdraw view of image with three outline components.
|
|
Because there are many overdraws, it is very bright!
|
|
For each Outline component, increase the mesh by 5 times. (In the case of the Shadow component, it doubles the mesh.)
|
|
In the image above, `1 x 5 x 5 x 5 = 125` overdraws are generated.
|
|
|
|
UIShadow's 'Addition Shadow' feature solves this issue by adding only the necessary mesh, `1 + 4 + 4 + 4 = 13` overdraws are generated.
|
|
|
|
|
|
|
|
|
|
<br><br><br><br>
|
|
## License
|
|
|
|
* MIT
|
|
* © UTJ/UCL
|
|
|
|
|
|
|
|
## Author
|
|
|
|
[mob-sakai](https://github.com/mob-sakai)
|
|
[](https://twitter.com/intent/follow?screen_name=mob_sakai)
|
|
[](https://www.patreon.com/join/2343451?)
|
|
|
|
|
|
|
|
## See Also
|
|
|
|
* GitHub page : https://github.com/mob-sakai/UIEffect
|
|
* Releases : https://github.com/mob-sakai/UIEffect/releases
|
|
* Issue tracker : https://github.com/mob-sakai/UIEffect/issues
|
|
* Current project : https://github.com/mob-sakai/UIEffect/projects/1
|
|
* Change log : https://github.com/mob-sakai/UIEffect/blob/master/CHANGELOG.md
|