UIEffect
===
UIEffect provide visual effect components for uGUI element in Unity.
[](https://github.com/mob-sakai/UIEffect/releases)
[](https://github.com/mob-sakai/UIEffect/releases)

[](https://github.com/mob-sakai/UIEffect/blob/master/LICENSE.txt)
[](http://makeapullrequest.com)
[](https://twitter.com/intent/follow?screen_name=mob_sakai)
<< [Description](#Description) | [WebGL Demo](#demo) | [Download](https://github.com/mob-sakai/UIEffect/releases) | [Usage](#usage) | [Example of using](#example-of-using) | [Development Note](#development-note) >>
### What's new? [See changelog ](https://github.com/mob-sakai/UIEffect/blob/develop/CHANGELOG.md)
### Do you want to receive notifications for new releases? [Watch this repo ](https://github.com/mob-sakai/UIEffect/subscription)
### Support me on Patreon! [](https://www.patreon.com/join/2343451?)
## Description
Let's decorate your UI with effects!
You can control parameters as you like from the script as well as inspector.
AnimationClip is supported as a matter of course!

#### Available effects
| Component | Features | Screenshot |
|-|-|-|
|**UIEffect**|Combine some visual effects.
**Effect Mode:** Grayscale, Sepia, Nega, Pixelation
**Color Mode:** Multiply, Fill, Additive, Subtract
**Blur Mode:** Fast, Medium, Detail
**Advanced Blur:** Enable more beautiful blurring.| |
|**UICaptured EffectImage**|Capture a screenshot of a specific frame with effect, and display it.
|
|**UICaptured EffectImage**|Capture a screenshot of a specific frame with effect, and display it.
This effect is non-realtime, light-weight, less-camera, but be effective enough.
**Effect Mode:** Grayscale, Sepia, Nega, Pixelation
**Color Mode:** Multiply, Fill, Additive, Subtract
**Blur Mode:** Fast, Medium, Detail
**Quality Mode:** Fast, Medium, Detail, Custom
**Capture On Enable:** When the component is enable, capture screen automatically.
**Blur iterations:** Number of blur iterations.
**Reduction/Downsampling Rate:** None, x1, x2, x4, x8
**Fit size to screen:** Fit RectTransform to the screen on captured.
**Immediate Capturing:**
*NOTE: This component can be used with UIEffect, UITransition etc.*
*NOTE: Immediate capturing does not support LWRP, WebGL and Unity 5.x for iOS/Mac.*| |
|**UIShiny**|Apply shining effect to a graphic.
|
|**UIShiny**|Apply shining effect to a graphic.
The effect does not require Mask component or normal map.
**Parameters:** Effect factor, Width, Rotation, Softness, Brightness, Gloss
**Effect Player:** To play shining, enable `Play` in inspector or call `Play()` from script.| |
|**UIDissolve**|Apply dissolve effect to a graphic.
|
|**UIDissolve**|Apply dissolve effect to a graphic.
**Color Mode for edge:** Multiply, Fill, Additive, Subtract
**Parameters:** Effect factor, Width, Rotation, Softness, Edge color
**Options:** Effect area, Keep effect aspect ratio
**Effect Player:** To play dissolving, call `Play()` from script.| |
|**UIHsvModifier**|Modify HSV for graphic.
|
|**UIHsvModifier**|Modify HSV for graphic.
**Target:** Color, Range
**Adjustment:** Hue, Saturation, Value| |
|**UITransition Effect**|Apply transition effect with a single channel texture.
|
|**UITransition Effect**|Apply transition effect with a single channel texture.
**Effect Mode:** Cutoff, Fade, Dissolve
**Options:** Effect area, Keep effect aspect ratio, transition texture
**Pass Ray On Hidden:** Disable the graphic's raycastTarget on hidden.
**Effect Player:** To show/hide transition, call `Show()/Hide()` from script.| |
|
##### The following effects can be used with the above components.
| Component | Features | Screenshot |
|-|-|-|
|**UIShadow**|Add shadow/outline to a graphic.
The performance is better than the default Shadow/Outline component.
**ShadowStyle:** Shadow, Shadow3, Outline, Outline8| |
|**UIGradient**|Change vertex color as gradient with angle and offset.
|
|**UIGradient**|Change vertex color as gradient with angle and offset.
**Direction:** Horizontal, Vertical, Angle, Diagonal
**Options:** Offset, Color space| |
|**UIFlip**|Flip a graphic.
|
|**UIFlip**|Flip a graphic.
**Direction:** Horizontal, Vertical, Both| |
|
## Demo
[WebGL Demo](http://mob-sakai.github.io/UIEffect)
* Effect sample
* Transition
* Dialog window with blured background
* Included in unitypackage
## Usage
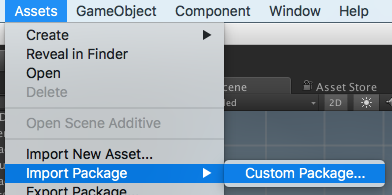
1. Download UIEffect.unitypackage from [Releases](https://github.com/mob-sakai/UIEffect/releases).
2. Import the package into your Unity project. Select `Import Package > Custom Package` from the `Assets` menu.
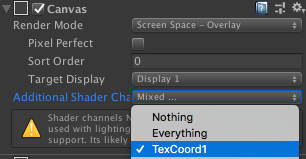
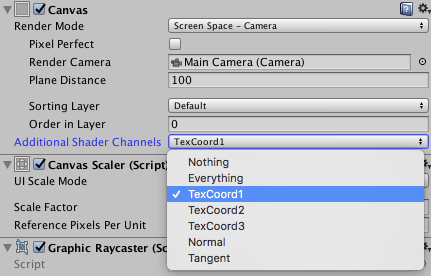
3. In Unity5.6+, enable `TexCoord1` channel of canvas. See also [Development Note](##note-unity-56).
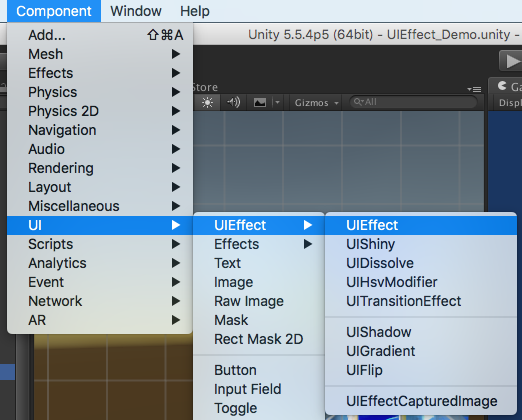
4. Add any effect component to UI element (Image, RawImage, Text, etc...) from `Add Component` in inspector or `Component > UI > UIEffect > ...` menu.
6. Adjust the parameters of the effect as you like, in inspector.

7. Enjoy!
#### Usage with TextMeshPro
1. Add a symbol `TMP_PRESENT` to scripting define symbols.

2. If the material does not support the effect component, the following warning will be displayed.
When you press the Fix button, new material is automatically generated and set.

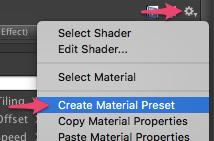
3. If you want to use material variants, select `Create Material Preset` from the context menu to duplicate the material.
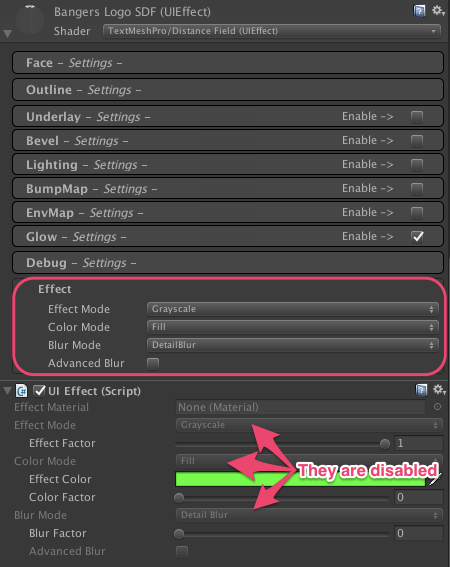
4. Effect mode, color mode, blur mode and etc. can not be changed from the component editor.
Change them from the material editor.
5. If you want to enable "Advanced Blur", enable `TexCoord2` channel of canvas.

#### Usage without TextMeshPro
1. When you uninstalled TextMeshPro from the project, remove a symbol `TMP_PRESENT` to scripting define symbols.

##### Requirement
* Unity 5.5+ *(included Unity 2018.x)*
* No other SDK are required
## Example of using
| Case | Description | Screenshot |
|-|-|-|
|Lock/unlock contents|Use UIEffect to apply grayscale.
Indicate to user that the content is unavailable.|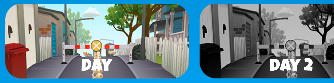|
|Silhouette|Use UIEffect for filling color.|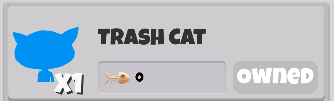|
|Soft shadow/
Outer glow|Use UIEffect and UIShadow to blur the shadow.
To blur only shadow, set `Blur Factor` in UIEffect to 0.||
|Colored shadow|Use UIEffect and UIShadow to fill shadow with color.
To fill only shadow, set `Color Factor` in UIEffect to 0.||
|Blurred dynamic font|Use UIEffect to blur text.
To blur dynamic font cleanly, enable `Advanced Blur` option.||
|Text with outline & shadow|Use two UIShadows to add outline and shadow.
There is less overdraw than default Outline/Shadow `(Default: 1 x 5 x 2 = 10 overdraws, UIShadow: 1 + 4 + 1 = 6 overdraws)`.||
|Shining button|Use UIShiny for shining button.
Shine the button and indicate to user that you can press the button.
Enable `Play` and `Loop` option to shine it without any AnimationClip.||
|Blurring the background of a menu|Use UIEffectCapturedImage to blur the background of a menu.
UIEffectCapturedImage applies an effect to the screen of the previous frame, without adding a camera or layer.
It's not a real-time post effect, so it's good performance and works well on mobile.|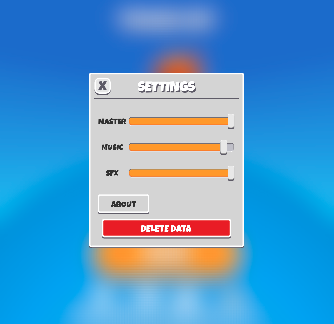|
|Screen transition|Use UITransitionEffect to add screen transition.
You can change transition texture (single channel texture).
Enable `Pass Ray On Hidden` option and use `Show()/Hide()` method to play transition without AnimationClip.||
## Development Note
#### How does UIEffectCapturedImage work?
`UIEffectCapturedImage` is similar to post effect, but uses `CommandBuffer` to give effect only on the rendering result (= captured image) of a specific frame.
This effect is non-realtime, light-weight, less-camera, blit only once, but be effective enough.
* Camera for processing effect is unnecessary.
* Process effect only once after `UIEffectCapturedImage.Capture`.
* Using reduction buffer, keep using memory size small and keep the rendering load are small.
* When GameObjects with motion are on the screen, a result texture may be stirred.
* You can overlay and display like as:
`[Screen] | [UIEffectCapturedImage] | [Dialog A] | [UIEffectCapturedImage] | [Dialog B]`.
See also [Demo](#demo).
#### Why is UIEffect lightweight?
* UIEffect pre-generates material from a combination of effects. This has the following benefits.
* Draw call batching If possible, draw calls will decrease.
* Since only the required material and shader variants are included in the build, the build size will be smaller.
#### How to control effect parameters for uGUI element WITHOUT MaterialPropertyBlock?
* In general, you can use [MaterialPropertyBlock](https://docs.unity3d.com/ScriptReference/MaterialPropertyBlock.html) for renderers to control minor changes in the material without different batches.
* However, changing the [MaterialPropertyBlock](https://docs.unity3d.com/ScriptReference/MaterialPropertyBlock.html) of the uGUI element from the script will cause different batches and draw calls to increase.
* So UIEffect encodes multiple effect parameters to UV1 channel with [IMeshModifier](https://docs.unity3d.com/ScriptReference/UI.IMeshModifier.html).
* Pack four 6-bit [0-1] (64 steps) parameters into one float value.
* The parameters are lower precision, but sufficient.
| uv1 | 6-bit [0-1] | 6-bit [0-1] | 6-bit [0-1] | 6-bit [0-1] |
|-|-|-|-|-|
| x(32bit float) | Tone level | *Empty* | Blur level | *Empty* |
| y(32bit float) | Red channel | Green channel | Blue channel | Alpha channel |
* In v3.0.0+, UIEffect uploads the parameter value to a shared texture and the shader refers to it.
This approach has the following advantages:
* More parameters for the effect are available.
* The parameter accuracy is improved from 6 bits to 8 bits.
* ModifyMesh is not called when parameter value is changed.
#### Note: Unity 5.6+
In Unity 5.6+, Canvas supports **Additional Shader Channels**.
Please enable `TexCoord1` to use UIEffect.

#### Note: if you include prefabs / scenes containing UIEffect in AssetBundle.
Use script define symbol `UIEFFECT_SEPARATE`.
Unused shader variants and materials will be excluded from AssetBundles.
||Combined mode (default)|Separated mode|
|-|-|-|
|Script define symbol| - |`UIEFFECT_SEPARATE`|
|Included in build|Only used variants|Only used variants|
|Included in AssetBundle|All variants (Heavy!)|Only used variants|
|Look in editor|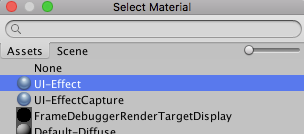|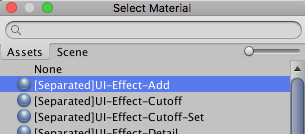|
#### How to improve performance?
* Use `ShaderVariantCollection` to preload shader.
https://docs.unity3d.com/Manual/OptimizingShaderLoadTime.html
* Set camera's clear flag to "Solid Color".
* Enable multi thread rendering.
#### The issue of default Outline component
Graphic with multiple outline components will generate a lot of overdraw.
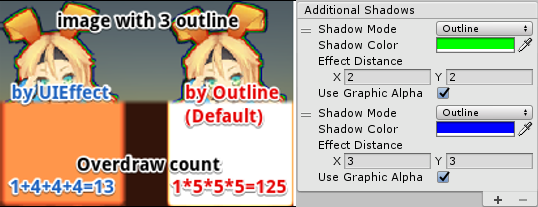
This is an overdraw view of image with three outline components.
Because there are many overdraws, it is very bright!
For each Outline component, increase the mesh by 5 times. (In the case of the Shadow component, it doubles the mesh.)
In the image above, `1 x 5 x 5 x 5 = 125` overdraws are generated.
UIShadow's 'Addition Shadow' feature solves this issue by adding only the necessary mesh, `1 + 4 + 4 + 4 = 13` overdraws are generated.
## License
* MIT
* © UTJ/UCL
## Author
[mob-sakai](https://github.com/mob-sakai)
[](https://twitter.com/intent/follow?screen_name=mob_sakai)
[](https://www.patreon.com/join/2343451?)
## See Also
* GitHub page : https://github.com/mob-sakai/UIEffect
* Releases : https://github.com/mob-sakai/UIEffect/releases
* Issue tracker : https://github.com/mob-sakai/UIEffect/issues
* Current project : https://github.com/mob-sakai/UIEffect/projects/1
* Change log : https://github.com/mob-sakai/UIEffect/blob/master/CHANGELOG.md